Essential electronic parts, for example resistors* capacitors* diodes and transistors are generally utilized as a part of any electronic mechanisms and contraptions. Knowing how to direct a test on this parts utilizing a multimeter might give you a thought on the best way to inconvenience shoot and repair any flawed cellphones or electronic supplies at home. Underneath are some essential D.i.y. as to testing of this parts utilizing a multimeter.
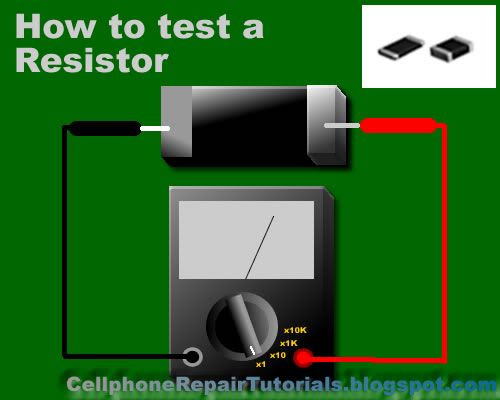
Instructions to Check Resistors?
Read the demonstrated code quality showed in Schematic Diagram then select the Ohm-scale inside yet not route underneath the demonstrated worth. A resistor is exceptional assuming that its safety is shut the demonstrated value.tolerance ought to be acknowledged with the ohmmeter perusing. While* no safety perusing whatsoever on the ohmmeter scale settings implies that the resistor is open. A zero safety perusing on all ohmmeter scale settings implies that the resistor is shorted
Instructions to Check Capacitors?
In most cases* a capacitor falls flat because of the weakening of the dielectric material between its plate.defective capacitors can have an interior shorted terminals* unnecessary spillage and debasement of capacitance meter. For an electrolytic capacitor (capacitors with polarity)* short the terminal capacitor to release it preceding testing.
To test a capacitor* set the multimeter to Rx10 or Rx1k scale. Interface the analyzer negative test to the capacitor positive terminal and the positive test to the negative terminal.
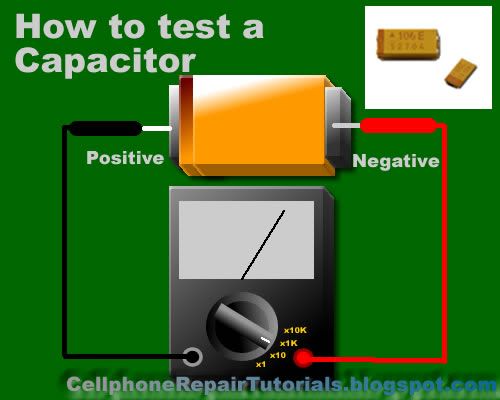
A great sign for electrolytic capacitor shows the meter needle diverting towards zero and moves back again to boundless safety position.
For ceramic* Mylar and other capacitor with a capacitance with less than 1.0 uf* the meter won't divert whatsoever
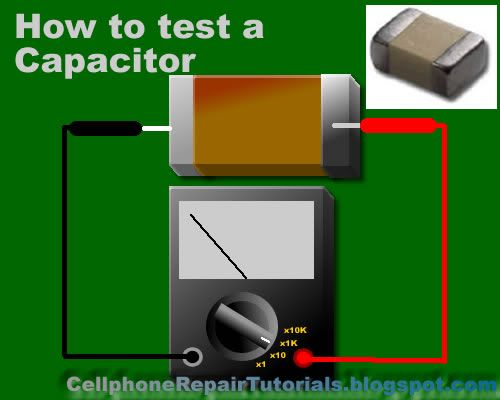
An inadequate implication for an electrolytic capacitor shows that the meter will rest on zero and remain stationary at a focus which is an evidence that the capacitor is shorted.
Step by step instructions to Check Diodes?
Set the multimeter handle to any of the safety position (x1* x10* x1k or 10k ohm ).Connect the positive test to the anode and the negative test to the cathode.then join the positive test to the cathode and the
negative test to the anode of the diode. An exceptional implication in the first methodology will indicate the meter redirected almost no or may not avoid whatsoever.
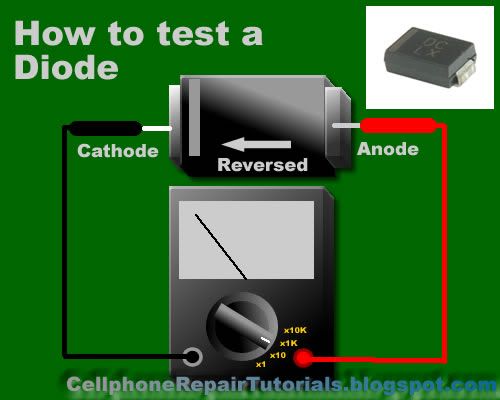
Also in the second procedure* the meter will redirect towards zero.the real safety perusing is the forward safety of the diode.
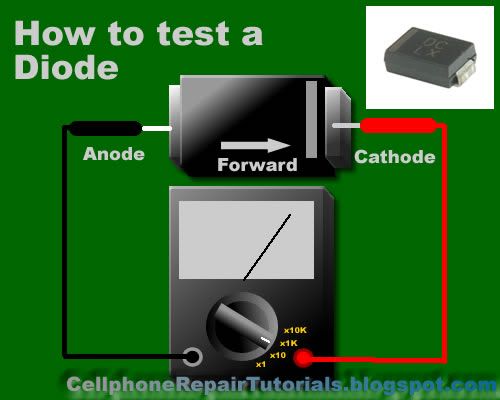
A deficient evidence shows that the meter won't redirect whatsoever indeed, when the tests are turned around. Alternately the meter diverts in the meantime or very nearly the same safety perusing for both steps.
The most effective method to Check Transistors:
Bipolar transistors are ordinarily looked at of a circuit by method of an ohmmeter. When it is wanted to check for the safety over the transistor emitter and collector* NPN or Pnp* ohmmeter tests may be joined either way. An exceptional transistor will indicate above a perusing above 1000 ohm.
The most effective method to confirm in the event that it is NPN or PNP transistor?
To confirm the right terminal of the transistors* set the reach selector to x 1 or 10 ohm.connect the positive test to the emitter and the negative test to the base of the transistor. Note the perusing exchange the association of the tests to the leads of the transistor.
Build your decision with respect to the table:
POSITIVE PROBE TO: -NEGATIVE PROBE TO: -RESISTANCE READING- - CONCLUSION:
Emitter- - - Base- - Less than 150 ohm -Transistor is NPN
Base -Emitter -Infinity -Transistor is NPN
POSITIVE PROBE TO: NEGATIVE PROBE TO: RESISTANCE READING: CONCLUSION:
-Emitter- -Base -Infinity - Transistor is PNP
Base - Emitter - - Less than 150 ohm - Transistor is PNP
Some inadequate signs of transistors: Resistance between any pair of the terminals is less than 10 ohms* implies that the transistor is shorted. Safety between base and emitter or base gatherer for both the forward and switch requisition of ohmmeter tests is interminability (meter needle don't deflect)* implies that the transistor is open. Transistors overheats (aside from force transistors) throughout typical working condition implies that the transistor is shorted.
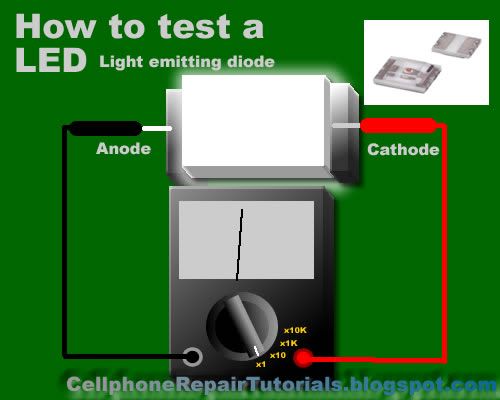
How Check a LED ( Light Emitting Diode)
Set the Muti-meter to x1 join the positive test to cathode and the negative test to anode. The great and working LED will then illuminate or glow* a busted LED won't.
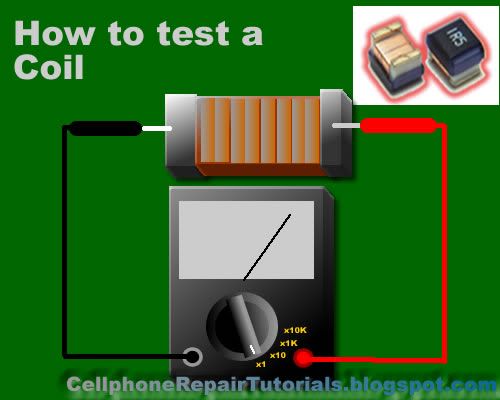
Step by step instructions to Check a Coil?
Set the multimeter to X1 an exceptional and working loop have a perusing give or take indicate zero ohms* without any perusing means the curl is open or busted
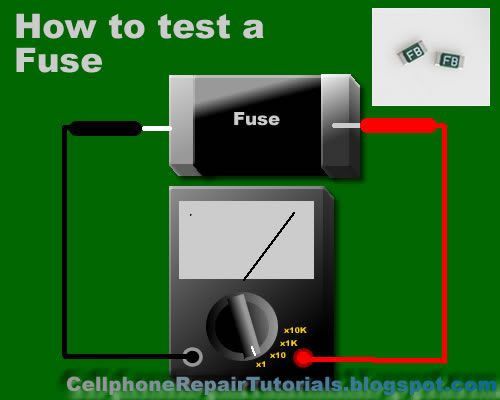
Instructions to Check a Fuse?
A blown SMD Fuse is not obvious to our * eye* just set the multi-meter to x1 and put both test to both close side of the circuit. A full perusing here to zero or coherence check is full. without any perusing means the wire is now busted.
Instructions to Check IC chips (Integrated Circuits)?
IC Chips is difficult to verify flawed by utilizing just a multi-meter* some development gear as the particular case that the producer utilized throughout their creations. Be that as it may; you can figure out a defective chips by around not many encounters concerning troubleshooting* One procedures is that by thinking about two same parts from each one in turn. like for instance; in the event that one chips is suspected to be faulty* then by displacing it with an exceptional and working same chips* you can now confirm it if the said chips got an issue. It is an experimentation technique from the get go; yet inasmuch as your experience and information abilities increases* you can confirm it all the more rapidly and exactly.
ref : http://itsolutionpack.blogspot.com/2013/04/how-to-check-basic-electronics.html